Bump Mapping
You can have other data in the textures besides just the color value. One application is storing the height data of the surface in them. This is called bump mapping (because we are mapping small bumps of the surface). Although usually normal mapping is used instead in order to do less calculations in the shader. Normal mapping is storing the normals in the image. For now let us focus on bump mapping.
Previously a flat surface had the same normal in any of its fragments. If we map a texture to it, the surface will still look like a flat surface, just with a picture drawn on it. If we want to achieve a more 3D-ish effect, we would need to either:
- Change the geometry depending on the image – expensive, because now we need a lot more vertices (although newer geometry shaders can help with that).
- Change the light calculations so that they would act like the surface is no longer flat – we will be doing that.
So, a bump map is a texture that has displacements of the surface stored in it. The actual height of the displacements will depend on how we use the bump map (only the range $[0, 1]$ is stored there). In the lighting calculations we need the normal. The normal is the first derivative of the bump map. In order to calculate (approximate) that derivative, there are finite difference methods used.
Finite difference is just taking a difference between two samples close enough together. There are three ways to do that, they differ by what samples we use in order to approximate the derivative at a certain point.
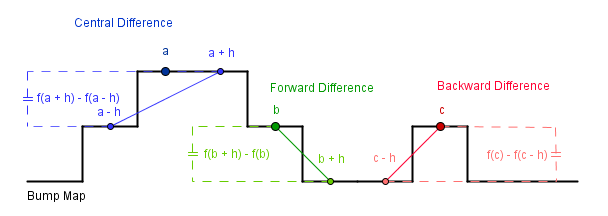
You can use any of those to approximate the derivative given by the bump map. Because our texture (and our surface) is 2-dimensional, then we need to take the derivative in both x and y directions. A vector that has both of those derivatives stored in it, is called the gradient vector. That will specify how much our bump map changes in a certain point.
Next we need to change the normal of the surface by that gradient vector. For example if our surface gains 1 unit of height in the positive direction, the normal needs to point 1 unit more to the negative direction. This means that we need to subtract the gradient from our current surface normal.
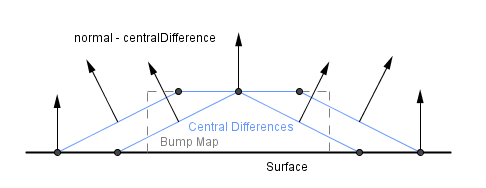
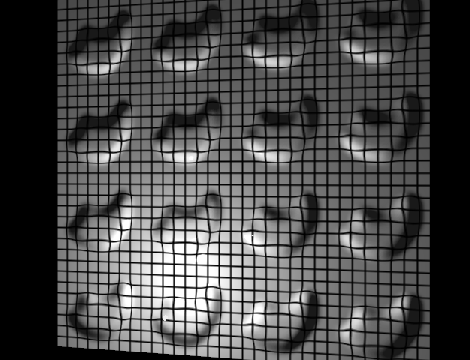
Those normals will then reflect the changes stored in the bump map. However, because the surface itself is still flat, this will only affect the lighting calculations and not the actual geometry. Sometimes, however, this will be enough.
Task is to implement bump mapping and besides changing the normal, use the gradient to sample the color values from a displaced location on the color texture. Start by using a white color texture and just change the normal to get the lighting calculations working. After that try to change the UV coordinates that you use to sample the color texture. Try simpler textures before.
Make sure that the displaced normal and the displaced UV coordinates are correct. I.e. you should displace the normal with a gradient transformed to the camera space. For UV coordinate displacement, it should be in the local space, however.
When things seem correct, try with some more interesting textures and bump maps.

JavaScript
Base code is located at:
https://cglearn.codelight.eu/files/course/7/BumpMappingJS.zip
There are many instructions in there that should guide you in the right path.
C++
Base code is located at:
https://cglearn.codelight.eu/files/course/7/BumpMappingCPP.zip
You will have to add time depended rotation to the drawScene() method in main.cpp file and finish the vertex and fragment shaders. Instructions are included in comments of the base code.